Thursday, January 3, 2019

NLog Implementation


Add below in Webconfig

<configuration>

<configSections>
    <section name="nlog" type="NLog.Config.ConfigSectionHandler, NLog"/>
<configSections>
<nlog xmlns="http://www.nlog-project.org/schemas/NLog.xsd" xmlns:xsi="http://www.w3.org/2001/XMLSchema-instance">
    <variable name="logDirectory" value="D:\LogFiles" />
    <targets>
      <target name="LogFile" xsi:type="AsyncWrapper">
        <target xsi:type="File" fileName="${var:logDirectory}\DirectMessageSender.txt" layout="${longdate}|${level:uppercase=true}|${logger}|${message}${onexception:|${exception:format=toString}}" archiveEvery="Hour" archiveFileName="${var:logDirectory}\DirectMessageSender.{#}.txt" archiveNumbering="Date" archiveDateFormat="yyyy-MM-dd-HH" />
      </target>
    </targets>
    <rules>
      <logger name="*" minLevel="DEBUG" appendTo="LogFile" />
    </rules>
  </nlog>

<configuration>


using NLog;

private Logger logger = LogManager.GetCurrentClassLogger();


logger.Error(ex);

Delete attached event receiver in sharePoint online list using Powershell

#Load SharePoint CSOM Assemblies
Add-Type -Path "C:\Users\sureshkumar.d\Desktop\PS Scripts\Microsoft.SharePoint.Client.dll"
Add-Type -Path "C:\Users\sureshkumar.d\Desktop\ PS Scripts\Microsoft.SharePoint.Client.Runtime.dll"
Add-Type -Path "C:\Users\sureshkumar.d\Desktop\CFR PS Scripts\Microsoft.SharePoint.Client.DocumentManagement.dll"

$siteUrl = "Sharepoint site URL"
$libraryName = "FilenameFix"

$AdminUsername = "******@***********.onmicrosoft.com" #Read-Host -Prompt "Enter Admin User Name: "
$AdminPassword = "********" #Read-Host -Prompt "Enter Password: " -AsSecureString
$password = ConvertTo-SecureString $AdminPassword -AsPlainText -Force
$credentials = New-Object Microsoft.SharePoint.Client.SharePointOnlineCredentials($AdminUsername, $password)

$srcContext = New-Object Microsoft.SharePoint.Client.ClientContext($siteUrl)
$srcContext.Credentials = $credentials
$srcContext.RequestTimeout = 100000 * 60 * 60;
$srcContext.PendingRequest.RequestExecutor.RequestKeepAlive = $true

$srcWeb = $srcContext.Web
$srcContext.Load($srcWeb)
$list = $srcWeb.Lists.GetByTitle($libraryName)
$srcContext.Load($list)
$srcContext.ExecuteQuery()

Write-Host $srcWeb.Title $srcWeb.Url $list.Title $list.Url

$srcWeb.DeleteObject()
$srcContext.Dispose()


function deleteListItemRemoteEventReceiver([Microsoft.SharePoint.Client.ClientContext]$context, [string]$listName, [string]$receiverName)
{
    Write-Host "Attempting to delete RER with name '$receiverName' on list '$listName'"


    $list = $context.Web.Lists.GetByTitle($listName)
    $context.Load($list)
    $eventReceivers = $list.EventReceivers
    $context.Load($eventReceivers)
    $context.ExecuteQuery()

    Write-Host $eventReceivers.Count

    $specifiedEr = $null
    try
    {
        foreach ($er in $eventReceivers)
        {
            if ($er.ReceiverName -eq $receiverName)
            {
                $specifiedEr = $er
            }
                if ($specifiedEr -ne $null -and !$specifiedEr.ServerObjectIsNull.Value)
               {
                    $specifiedEr.DeleteObject()
                    $context.ExecuteQuery()
                    Write-Host "Receiver deleted successfully"
                    break;
                }
                else
                {
                    Write-Error "Failed to find receiver with name '$receiverName'"
                }
        }

       
    }
    catch
    {
        Write-Error "Failed to delete receiver - error:  $_"
    }
}


$receiverName = "FixReRItemAdded"
# now call function..
deleteListItemRemoteEventReceiver $srcContext $libraryName $receiverName

List event receiver attached with SharePoint Online list or Library using PowerShell

#Load SharePoint CSOM Assemblies
Add-Type -Path "C:\Users\sureshkumar.d\Desktop\PS Scripts\Microsoft.SharePoint.Client.dll"
Add-Type -Path "C:\Users\sureshkumar.d\Desktop\ PS Scripts\Microsoft.SharePoint.Client.Runtime.dll"
Add-Type -Path "C:\Users\sureshkumar.d\Desktop\CFR PS Scripts\Microsoft.SharePoint.Client.DocumentManagement.dll"

$siteUrl = "Sharepoint site URL"
$libraryName = "FilenameFix"

$AdminUsername = "******@congruentsoftindia.onmicrosoft.com" #Read-Host -Prompt "Enter Admin User Name: "
$AdminPassword = "********" #Read-Host -Prompt "Enter Password: " -AsSecureString
$password = ConvertTo-SecureString $AdminPassword -AsPlainText -Force
$credentials = New-Object Microsoft.SharePoint.Client.SharePointOnlineCredentials($AdminUsername, $password)

$srcContext = New-Object Microsoft.SharePoint.Client.ClientContext($siteUrl)
$srcContext.Credentials = $credentials
$srcContext.RequestTimeout = 100000 * 60 * 60;
$srcContext.PendingRequest.RequestExecutor.RequestKeepAlive = $true

$srcWeb = $srcContext.Web
$srcContext.Load($srcWeb)
$list = $srcWeb.Lists.GetByTitle($libraryName)
$srcContext.Load($list)
$srcContext.ExecuteQuery()

Write-Host $srcWeb.Title $srcWeb.Url $list.Title $list.Url

$srcWeb.DeleteObject()
$srcContext.Dispose()


function listEventReceivers([Microsoft.SharePoint.Client.ClientContext]$context, [string]$listName)
{
    Write-Host "Attempting to iterate event receivers on list '$listName'"

    $list = $context.Web.Lists.GetByTitle($listName);
    $context.Load($list)
    $eventReceivers = $list.EventReceivers
    $context.Load($eventReceivers)
    $context.ExecuteQuery()

    Write-Host "Found" $eventReceivers.Count "receiver(s) on this list"

    foreach ($er in $eventReceivers)
    {
        #if ($er.ReceiverName -eq $receiverName)
        #{
                Write-Host ("Found ER: " + $er.ReceiverName)
                Write-Host ("   ReceiverClass: " + $er.ReceiverClass)
                Write-Host ("   ReceiverAssembly: " + $er.ReceiverAssembly)
                Write-Host ("   EventType: " + $er.EventType)
                Write-Host ("   ReceiverUrl: " + $er.ReceiverUrl)
                Write-Host ("   Synchronization: " + $er.Synchronization)
       # }
    }
}

# now call function..
listEventReceivers $srcContext $libraryName

on premise ad synchronize with sharepoint online user profile

SharePoint Online uses the Active Directory Import timer job (AD Import) to import users and groups into the User Profile Application. AD Import syncs changes from the SharePoint Online (SPO) Directory Store to the User Profile Application. The timer job requests changes from the SPO Directory Store and then copies the values to the user profile properties that are configured for synchronization. AD Import syncs a subset of the Azure Active Directory attributes that are synced by Azure AD Connect. The profile properties that are synced by AD Import aren't configurable.
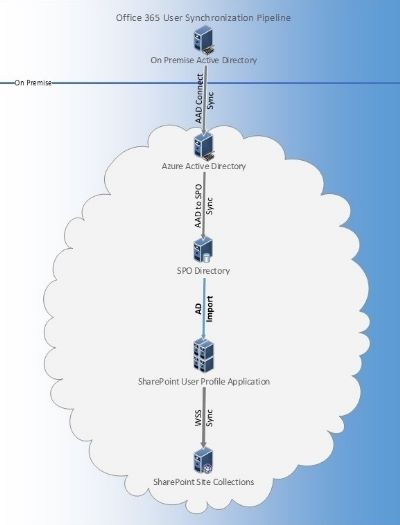
Graphic depiction of the Office 365 User Synchronization Pipeline


  • The on-premises active directory is synced to the Azure active directory either using Azure AD sync or customized PowerShell approach.
  • Once employee profiles are synced to the Azure AD, a background process loosely referred as an “AAD to SPO Sync” runs to populate all the global Office 365 tenants AAD profiles in the SPO directory. This SPO directory is nothing but active directory hosted on the Microsoft cloud servers to host all the SPO online profiles source data.
  • As many of you have realized, SharePoint 2016 introduced “AD Import” method to simplify the SharePoint user profile import process to import users profile data with minimal properties. To standardize the process and consistent approach, Microsoft is using AD import method to import global SPO Directory data into the Sharepoint user profile store.

There are four processes in the user synchronization pipeline in Office 365:
Sync process
Description
Azure AD Connect
Azure AD Connect syncs data from your on-premises Active Directory to Azure Active Directory. For more information, see: Integrating your on-premises identities with Azure Active Directory.
AAD to SPO Sync
Azure Active Directory syncs data from Azure Active Directory to the SPO Directory Store.
AD Import
Active Directory Import syncs data from the SPO Directory Store to the User Profile Application.
WSS Sync
WSS Sync syncs data from the User Profile Application to the SharePoint Online site collection.

Wednesday, December 19, 2018

Azure Active Directory


Azure Active Directory


Azure Active Directory (Azure AD) provides secure and seamless access to cloud and on-premises applications. 


Monday, December 17, 2018

Microsoft Flow


What is Microsoft Flow?
Microsoft Flow is an online workflow service that automates events (known as workflows) across the most common apps and services

Flow can integrate SharePoint, Outlook, Dynamic365, one drive, Salesforce, Azure Resource manager

What can you do with Microsoft Flow?

You can use Microsoft Flow to automate workflows between your favorite applications and services, sync files, get notifications, collect data, and much more.

ou can also use Microsoft Flow to copy files.

Where can I create and administer a flow?

You can create a flow and perform administrative tasks in a browser or, if you download the Microsoft Flow mobile app, on your phone.

Here are some of the tasks you can perform:
·         Turn flows on or off from wherever you are.
·         See when a flow has failed.
·         Review detailed run history reports.
·         View and filter runs by notification type.
Important concepts in Microsoft Flow
Keep these concepts in mind when building flows:
·         Every flow has two main parts: a trigger, and one or more actions.
·         You can think of the trigger as the starting action for the flow. The trigger can be something like a new email arriving in your inbox or a new item being added to a SharePoint list.
·         Actions are what you want to happen when a trigger is invoked. For example, the new email trigger will start the action of creating a new file on OneDrive for Business. Other examples of actions include sending an email, posting a tweet, and starting an approval.
How button flows are started
Buttons are flows that are started through a manual action. For example, you can create a button to send a Working from home today email to your manager. If you live far from your workplace, you can then use this button on days when the traffic is a mess!
·         Select Buttons to use some of these flows.

·         Select Browse to check out templates for more button flows that you can add to your collection.

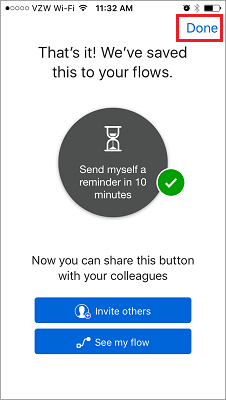
To show you how you can use buttons, we'll use the Send myself a reminder in 10 minutes button template.
1.    Select Buttons, and then Browse.
2.    Select the Send myself a reminder in 10 minutes button flow.
3.    Select Use this template.

4.    Select Create, and then select Done.

The flow is saved.

5.    Select Buttons to see the new flow.

6.    Select the flow. In 10 minutes, you'll get a reminder.
It's simple to add more buttons to your collection.
Modify or delete a flow
If you want to change or delete one of your flows, it's easy.
1.    Select Flows.

2.    Select one of your flows.

3.    Select one of the options:
·         To enable or disable the flow, turn the Enable flow option on or off.
·         To change the flow, select Edit flow.
·         To get an idea of the successful and unsuccessful runs of the flow, select Run history to view the history of the flow.
·         To delete a flow, select Delete flow.


Find and Replace string in Word


       Find and Replace string in Word

       using Microsoft.Office.Interop.Word;

           var doc = new   Microsoft.Office.Interop.Word.Application().Documents.Open(
                       @"C:\Users\sureshkumar.d\Desktop\PDFMerge\S2\Test1.docx");

            doc.Content.Find.Execute("{id}", false, true, false, false, false, true, 1, false, "12345", 2,
            false, false, false, false);
            doc.SaveAs2(@"C:\Users\sureshkumar.d\Desktop\PDFMerge\S2\Test2.docx");
            doc.Close();

Wednesday, December 12, 2018

Issue : - SharePoint Profile Picture not Sync with Delve

Issue : - SharePoint Profile Picture not Sync with Delve


Steps:-

1.           Edit user profile
2.           Search “Picture Exchange Sync State”
3.           Set Picture Exchange Sync State = 1 to Picture Exchange Sync State = 0
4.           Remove profile picture & save.
5.           Launch the below url from browser, you already signed in your Tenant site.


6.           Upload your photo
7.           After Wait for some time, click profile like below
8. it will redirect to delve site. you can verify.